Two converters run the same fluorescent powder on the same machine. Eighteen months later, one part is still bright and the other has gone chalky. The pigment is rarely the difference. What decides the outcome is what sits under the colour, how thick the colour layer is, and what covers it — the build, taken one layer at a time.
What Sits Under the Colour
A fluorescent colour carries two signals at once. The film scatters some incoming light straight back, the way any pigmented coat does. On top of that, the dye inside absorbs short-wavelength light and re-emits it at a longer wavelength, and that emitted light leaves the film as a second contribution. Brightness is the sum of both.
The second signal only exists because the film lets light in. A fluorescent colour layer is deliberately semi-transparent: light has to reach the dye before the dye can do anything. That means a share of incoming light passes straight through the colour layer and arrives at whatever is underneath.
That is where the base decides the result. Over a white or light ground that scatters well, the light that passed through comes back up into the colour layer, where the dye can absorb it and emit again. Over a dark ground, that light is gone. Same powder, same film thickness, visibly different result — and the difference is not a perception effect.
A light base does a second job that has nothing to do with brightness. An opaque, strongly scattering underlayer is itself a barrier to ultraviolet light. Pigments that absorb strongly in the UV region provide real protection, with one condition: they only work where the system can tolerate an opaque or near-opaque layer. The moment you need a transparent or translucent film, that route closes — which is exactly the situation a fluorescent colour layer is in [4].
One caution before this becomes a rule of thumb. A white base raises brightness but also lifts apparent lightness, and a thin colour layer over a bright ground reads paler than the same layer over a neutral one. If the shade has to match a standard, the base is part of the colour, not a background. Fix the base first, then match.
Keeping the Colour Layer Thin Enough to Stay Transparent
Everything above depends on the colour layer staying translucent, and translucency is a thickness question before it is a loading question. Light enters, excites a dye molecule somewhere inside the film, and the emitted light then has to travel back out. The farther it travels, the more likely it is to encounter another dye molecule on the way and be reabsorbed before it escapes. Thick films trap their own emission.
Thin films fail in the opposite direction. Below a certain thickness the layer stops hiding what is under it. The base colour shows through, the shade shifts, and on a patterned or dark substrate the face becomes uneven. Adding more pigment does not fix that — the problem is coverage, not concentration.
The colour layer has one target, not a range to optimise: just opaque enough to hide the ground, no thicker than that. In practice this is where most of the argument happens, because the two requirements pull in opposite directions and the window is narrow.
Three checks on the colour layer, in the order they fail.
- Does it hide the ground at the thinnest point of the film, not the average? Drawdowns taper at the edges.
- Hold it up against a window. If you can see the light source as a shape, the layer is thin enough for the dye to work and probably too thin to cover a dark ground.
- Compare the same film on white and on black. If the two faces read the same shade, the layer is opaque and the dye is being wasted.
UV Screening Belongs in the Topcoat
Here is the structural contradiction. The colour layer has to be transparent, so it cannot block ultraviolet light. Ultraviolet light is the part of the spectrum that drives fading. The layer that must stay open is the layer that needs protecting, and it cannot protect itself.
That leaves the topcoat. Ultraviolet absorbers take in UV radiation and release the energy as heat without decomposing; their absorbance is a measure of screening power and follows the Beer–Lambert law, so screening scales with how much absorber sits in the light path and how far the light travels through it [4]. In multilayer coating systems these absorbers are normally placed in the outermost layer only, with the layers below relying on the filtering effect of the full depth of material above them [4].
Hindered amine light stabilisers work differently and are not a substitute. They do not absorb UV at all. They interrupt the photo-oxidation chain after it has started, acting as radical scavengers, and they are regenerative rather than consumed. They also carry costs a formulator has to accept: they can reduce gloss, they can migrate, and used alone they need very high concentrations. That is why they are almost always paired with an absorber rather than replacing it [4].
Thickness decides whether any of this works. An absorber needs enough material in the light path to attenuate what passes through, and thin films are the known weak point. This is why polymeric or binder-bound stabilisers are preferred where a thin film has to hold up over years — low-molecular-weight additives that can move are the ones that leave [4]. A topcoat specified by resin type alone, with no film thickness attached, is an unfinished specification.
There is one more reason to place the screen as close to the surface as the system allows. Fluorescent substances do not only emit. In a study of photofading, adding a fluorescent compound accelerated the fading of a dye in the same system, most strongly when the irradiation wavelength fell in that compound's maximum excitation region, and the mechanism ran through triplet sensitisation [3]. The study examined fluorescent brighteners and dyes in solution, not pigment powders in a binder, so it does not supply a number. What it establishes is the direction: a fluorescent species can hand absorbed energy on to a degradation pathway rather than releasing all of it as light. Screening early is cheaper than repairing later.
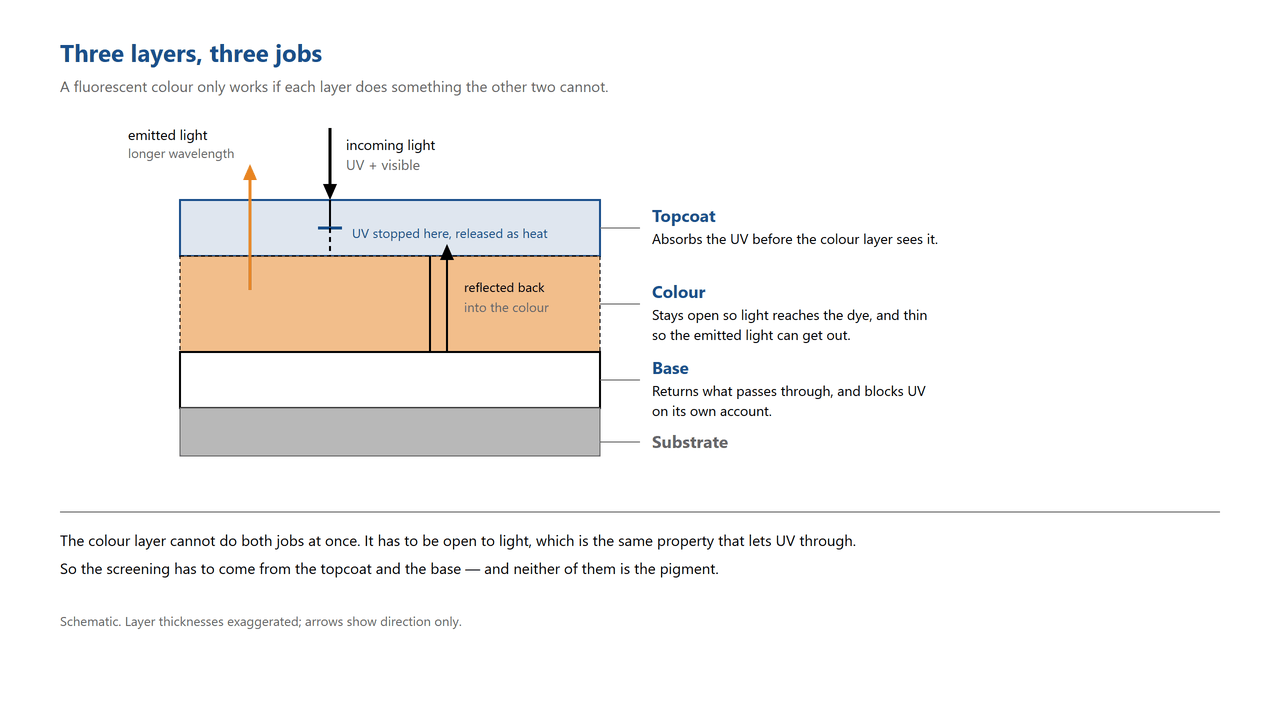
Three layers, three jobs: the base returns light to the colour, the colour stays open so the dye can work, the topcoat takes the ultraviolet before it arrives. Schematic, not a measured cross-section.
Why the Topcoat Fails First
A screening layer is not a permanent fixture. Absorbers migrate from the clearcoat into the layers beneath it, and when they do, screening power at the surface falls. Raising molecular weight or bonding the absorber to the binder slows that loss but does not stop it [4]. Once the surface holds less absorber than it was designed with, more UV reaches the colour layer than the design assumed.
This gives fading a direction. Damage accumulates where the light is strongest — the surface — and moves inward as the barrier thins. A part that has lost its topcoat protection does not fade evenly through its depth. The face goes first, and the colour underneath is still intact for a while.
Two practical consequences follow. Adding more pigment is the wrong response to early fading in a well-covered film — the pigment was not the limiting factor, the barrier was. Service-life complaints and pigment complaints also get conflated because both look like "the colour went dull." Separating them takes one cut: section the part and compare the face against the depth. If the loss is concentrated at the surface, the build failed. If it is uniform, the colour layer itself is the problem.
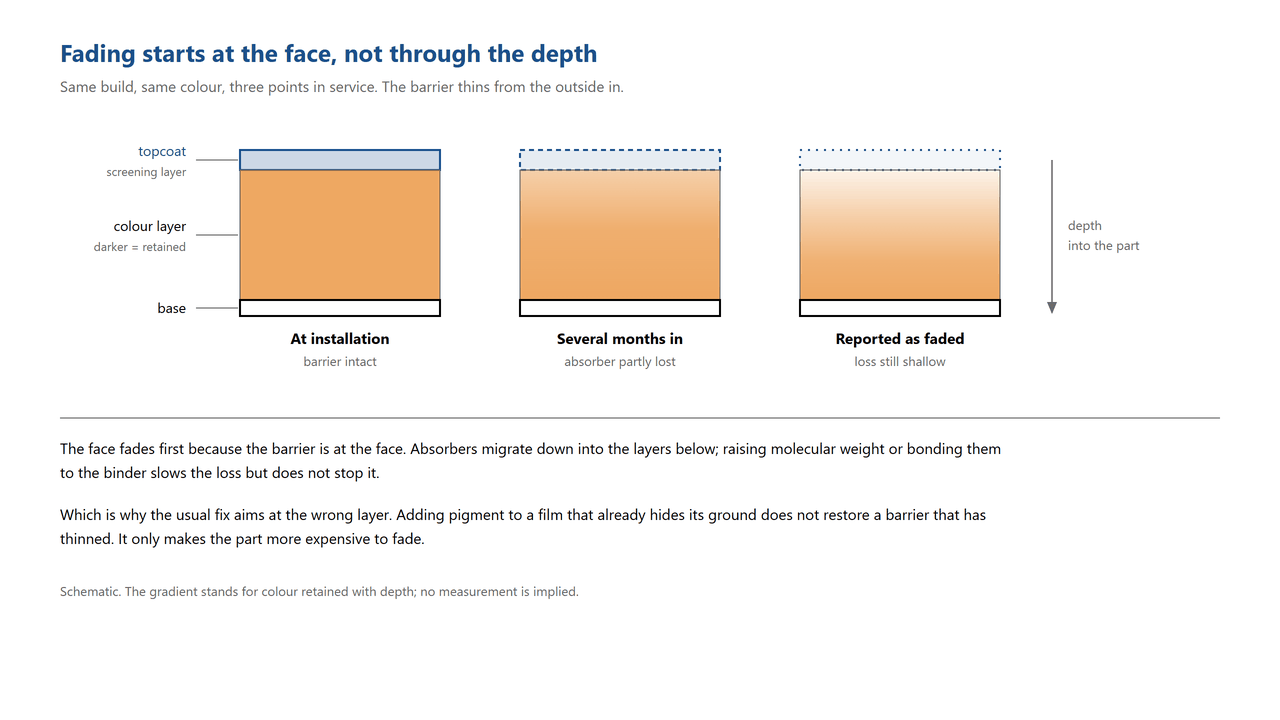
Where the barrier thins, damage concentrates. A section through a faded part shows the face losing colour before the depth does. Schematic, not measured data.
Specifying the Build by Service Life, Then Confirming It
The build is a set of decisions, and each one belongs to a different stage of the job. The table below gives the order to settle them in, with the failure each layer produces when it is the one that was got wrong.
| Layer |
What it has to do |
The one thing to fix before ordering |
How it looks when this layer is the failure |
| Base |
Return light to the colour layer and hold the shade steady against the substrate |
Lightness and hiding power of the ground |
Shade reads dull or grey from the start; no amount of pigment lifts it |
| Colour |
Stay open enough for the dye to work, closed enough to hide the ground |
Film thickness at the thinnest point, and the coverage that comes with it |
Patchy face, or a bright but pale shade over a shifting substrate |
| Topcoat |
Take the ultraviolet out before it reaches the colour, and keep taking it out |
Stabiliser chemistry together with the dry film thickness of the coat |
Gloss drops first, colour follows; the loss sits at the surface |
Then confirm it rather than assuming it. The two standards most often cited for this kind of claim measure different things and do not convert into each other. ISO 105-B02 exposes textiles to an artificial source representing daylight and allows two different sets of blue wool references, with the standard itself stating that results from the two sets may not be identical [1]. ASTM D4303 establishes categories from the colour difference before and after exposure, calculated in CIELAB, and notes that variations in results may be expected between its test methods [2]. Neither standard converts a grade into a number of years, and neither tells you what your own build will do on your own substrate.
Run the build you intend to sell, on the substrate you intend to sell it for, against the standard your customer recognises — and run the base and topcoat variants alongside it, because those are the variables that decide the answer. If you want to start with the colour, the fluorescent pigment category covers the range, and the powders used for this kind of work are listed under neon fluorescent pigment powders. Grades nearer the red end of the range, such as a bright red fluorescent grade, behave differently from the greens and yellows in light, so pick the shade before the build, not after.
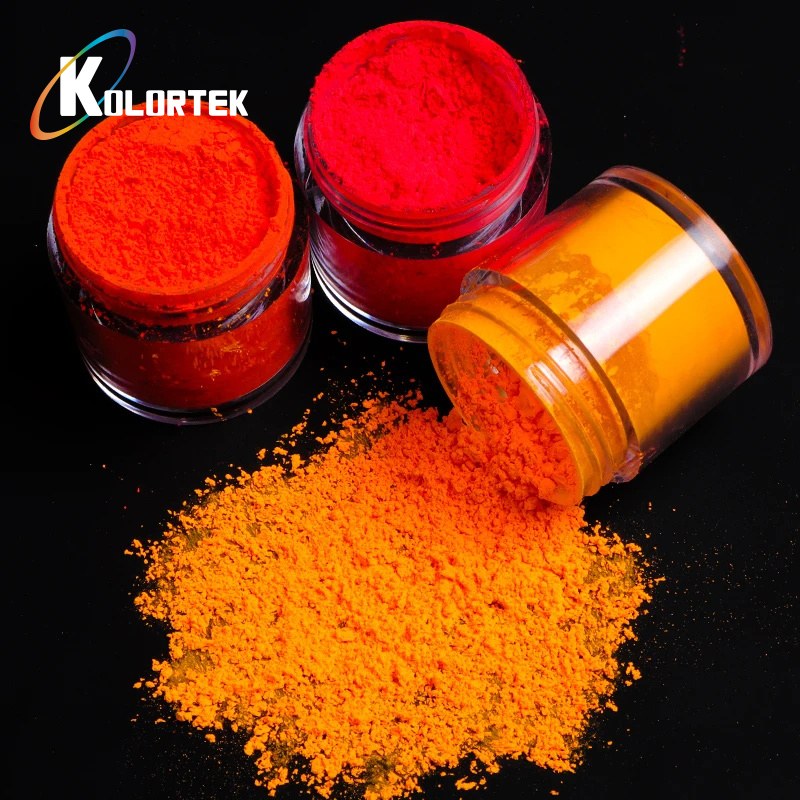
Fluorescent powder as supplied, before it becomes a layer. The build around it, not the powder, decides how long the colour survives.
Packed for dispatch. What arrives is one part of the system; the base and the topcoat are decided on your line.
If you would rather start from the paperwork, the fluorescent pigment catalogue lists what we can supply and under what conditions. Send the substrate, the intended film thickness and the exposure the part will see, and we will tell you which part of that we can support and which part has to be settled on your line.
References
- ISO 105-B02:2014. Textiles — Tests for colour fastness — Part B02: Colour fastness to artificial light: Xenon arc fading lamp test. International Organization for Standardization: Geneva, 2014. https://www.iso.org/standard/65209.html
- ASTM D4303-10(2022). Standard Test Methods for Lightfastness of Colorants Used in Artists' Materials. ASTM International: West Conshohocken, PA, 2022. https://doi.org/10.1520/D4303-10R22
- Yamada, K.; Shosenji, H.; Gotoh, K. The Effects of Fluorescent Substances on the Photofading of Colours. Journal of the Society of Dyers and Colourists 1977, 93 (6), 219–223. https://doi.org/10.1111/j.1478-4408.1977.tb03351.x
- Lakin, E. Innovative Measurement Methodology in the Study of Weathering of Automotive Coatings. PhD thesis, Aston University, 2010. http://publications.aston.ac.uk/15338/

 Français
 English
 Deutsch
 Русский
 Español
 Português